Lime Green News Home My Art Work Lesson Plans Rubber Stamps Photo Album Site Info Site Map Links


Words: Charm Bracelet Lesson Plan
.

Decorate a Celtic Gift Bag Decorate a Celtic Gift Bag
Rubber Stamping Project by Carolyn Hasenfratz
Copyright © 2014 Do you like this tutorial? Share it!

Contents:
  • Introduction
  • Tools and Materials
  • Stamp the Bag
  • Finishing Touches


Introduction

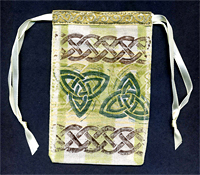
Just in time for St. Patrick's Day celebrations, here is an idea for decorating a drawstring muslin bag with Celtic designs. Fill with St. Patrick's Day treats or a gift for someone who would enjoy Celtic designs at any time of year.

Tools and Materials

Muslin drawstring bag
1/2 inch wide ribbon
1/4 inch wide ribbon
Scrap cardboard or chipboard
Celtic themed rubber stamps
Brayer
Freezer paper or ink palette
Rags or paper towels for wiping down tools and palette
Wide masking tape
Fabric rubber stamping ink
Heat tool
Clean scrap paper
Iron
Ironing board
Fabric scissors
Needle
Thread
Pins
Scrap wire


Stamp the Bag
  1. First remove the string that comes with the drawstring bag.


  2. Decorate a Celtic Gift Bag
  3. Cut a piece of scrap cardboard or chipboard that fits snugly inside the bag and insert in the bag. This is to prevent stamped ink from bleeding through to the other side of the bag.


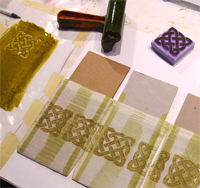
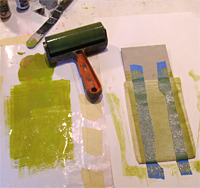
  4. Use masking tape to mask off two vertical stripes on one side of the bag. Tear the tape into strips for a more organic, interesting line.


  5. Put some fabric stamping ink of a fairly light color onto a palette and spread with a brayer. I used a blend of ColorBox Crafters ink for my samples. If you don't have a palette, you can make a temporary palette by taping freezer paper to your work surface.


  6. Apply color to the bag with the brayer. Dry ink with your heat tool taking care not to get it too close or it may burn the bag or cardboard. I like to place the item I'm drying on a metal cookie sheet with ceramic tiles underneath while using the heat tool to avoid conducting too much heat to the table top.


  7. When ink is dry enough to handle, remove tape and flip bag over and repeat the masking and inking process.


  8. Decorate a Celtic Gift Bag
  9. Apply more ink colors to your palette and roll out with the brayer. You can apply ink to the stamp either by rolling the brayer over the stamp or by pressing the stamp into the ink rolled on the palette.


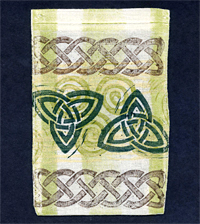
  10. Stamp the bag on both sides with Celtic themed stamps in your choice of colors. I didn't happen to have any Celtic stamps in my collection so I carved some for this project - if you want to carve your own stamps, here is a stamp carving tutorial I wrote. Cleaning between ink colors will be easier if you begin with lighter colors and finish with dark colors. Dry the ink with the heat tool as needed for handling.


Finishing Touches
    Decorate a Celtic Gift Bag
  1. Many fabric stamping inks, such as the Crafters ink I used, are waterproof after heat setting. To set the ink and also make sure that the bag is completely dry, place a piece of clean scrap paper on your ironing board, the bag next, then top with another layer of clean scrap paper. Iron the bag and see if there is any ink residue left behind on the paper. Repeat with fresh clean scrap paper until no more ink residue is left behind.


  2. Cut a piece of 1/2 inch ribbon a little wider than than the bag. Fold the ends under and pin so that after folding the ribbon is exactly the width of the bag. Pin to the top edge of the bag.


  3. Sew the long edges of the ribbon to the bag, and hem the ends without sewing them down, leaving a hollow channel.


  4. Repeat for the other side of the bag.


  5. Cut a piece of 1/4 inch ribbon about three feet long, fold in half, then cut in half. Make a loop with a piece of wire to pull each piece of ribbon through the channel you sewed. My sample bag is 4 inches wide, for a larger or smaller bag you might need to adjust the length of the ribbon.


  6. Tie the ribbon ends together on each side and you're done! There are a lot of gifts you could present in this bag. One suggestion is to make a Celtic themed handmade soap bar - see my recipe Green Fields Soap Bar.


Return to top | Return to Lesson Plan menu


Copyright © 1996-2018 by Carolyn Hasenfratz
Home | My Art Work | Lesson Plans | Photo Album | Site Info | Links
Please also visit my other web sites:
Carolyn Hasenfratz Design
www.chasenfratz.com/wp
Etsy Shop
http://www.etsy.com/shop/CarolynsStampStore
Sell 66 Stuff
www.sell66stuff.com