Charm Bracelet
Do you like this tutorial? Share it!
A favorite pastime of mine is to cruise the local thrift stores looking for cheap and broken jewelry to buy and take apart. Not only is this a great way to learn how jewelry is made, it's also an interesting source of parts to make new creations.
1. Materials Needed:
Chain
Clasp and clasp termination (if the clasp doesn't come with it's own termination use a jump ring)
Jump Rings
Head Pins
Assorted beads and charms
Tools:
Needlenose pliers
Wire cutters (some needlenose pliers include a wire cutter)
file
2. Process
Step 1: Select a piece of chain and cut off a piece that fits your wrist. Remember to take the length of the clasp you will be using into account. You can cut the chain by pulling a link apart with pliers or by cutting a link with wire cutters. Discard the broken link.
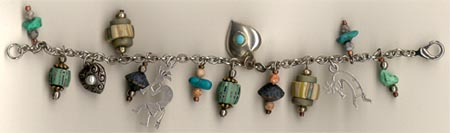
Step 2: Gather together all the parts you'll need for the bracelet. For the bracelet in the picture, I used four charms, 10 (relatively) large beads, 20 medium beads, 20 tiny beads, 15 jump rings (one for the clasp), one lobster claw clasp and ten headpins. Most people choose metal parts that are all one color, for example silver chain with silver jump rings, silver headpins, silver clasp, etc. That doesn't mean you can't mix colors if you want to. You can design with all charms, all beads, or a mixture of beads and charms as I did in the sample bracelet. You will need one jump ring for each charm, and for each bead you'll need one headpin, one jump ring, and four smaller accent beads. The accent beads not only give a finished look to the beads but also keep the large beads from slipping off of the headpins. My bracelet has 14 dangles. You don't need to use that many if you don't want to.
Step 3: Attach the clasp to the chain.
Step 4: Lay the bracelet on the table and arrange the charms and beads you've selected on both sides of the chain to get an idea of how the finished bracelet will look. Experiment with the placement and decide if you need to add or delete anything.
Step 5: Once you've decided what beads and charms you'll use, attach a jump ring to each charm. Don't attach them to the bracelet yet.
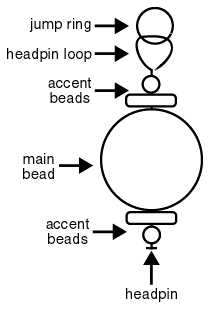
Step 6: Thread each bead with its accent beads onto a headpin and make a loop at the top of the headpin with needlenose pliers. If the headpin is too long, use the wire cutters to trim off what you don't need. Smooth any rough edges on the cut end with the file.
Step 7: Attach a jump ring to the top of each headpin.
Step 8: After all the beads have been threaded on headpins, you are ready to attach all of the parts to the bracelet. To help space them evenly, divide the number of links in the chain by the number of attachments, and space them that many links apart. For example on my bracelet:
56 links divided by 14 attachments = 4 links between each attachement
Step 9: Open each jump ring to attach the item to its designated link on the bracelet. After they are all attached, you're done!
Return to top | Return to Lesson Plan menu
|