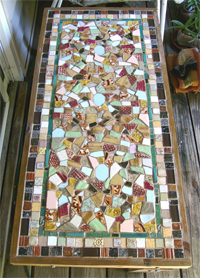
 Mosaic Table Top With Textured Clay Tiles
Craft Project by Carolyn Hasenfratz Winkelmann
Copyright © 2013-2021
Do you like this tutorial? Share it!
Contents:
- Introduction
- Tools and Materials
- Make the Tiles
- Make the Mosaic
- Tools and Materials
Introduction
I love to make things out of reclaimed or repurposed items. While I was digging my garden, I found lots of construction debris in the soil including a number of ceramic tiles, broken and whole. I decided to incorporate them into a mosaic table top on a table that was built for me by my Dad out of scrap wood.
The middle part of the table top is made of random pieces salvaged from the garden soil and other sources, such as broken ceramics and tiles that I made. If you're sad about having broken a ceramic piece that you like, it's very satisfying to incorporate the pieces into something good. I wanted a more regular edge for contrast so I made some square and rectangular tiles to order, some of which are textured with rubber stamps. I also took some scrap composite tile samples made from some kind of plasticy material that I got from Leftovers, Etc. and cut them into squares and rectangles to augment my ceramic tiles.
In this tutorial I'll show you to make some tiles and then incorporate them into a mosaic table top surface.
Tools and Materials
Ceramic clay
Rolling pin
Two flat strips of wood of equal thickness
Rubber stamps
Acrylic mounting block
Work surface (canvas stretched over a board works well)
Pizza cutter (reserved for non-food use)
Knife with non-serrated blade (reserved for non-food use)
Non-stick cooking spray
Small loop clay carving tool
Make the Tiles
- Place two strips of wood of equal thickness on your work surface. Roll out some clay between the two strips.
- If you have large unmounted stamps, spray them with cooking spray, wipe off excess and lay them down on the clay and roll the rolling pin over them. Roll slowly and steadily from one end of the other and do not roll back in the other direction. Pull up stamps and cut clay into tiles with the pizza cutter.
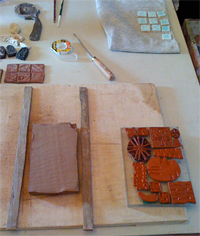
Roll out clay |
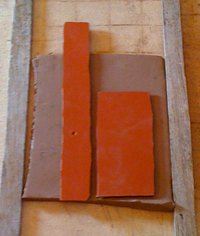
Place stamps on clay |
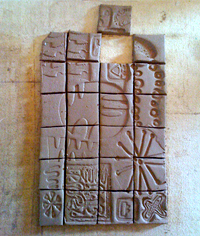
Cut apart |
- Here is a method for using a bunch of small rubber stamps together. Temporarily mount them all on an acrylic mounting block. Spray with cooking spray and wipe off excess. After rolling out the clay between the two strips, move work surface to floor. Place acrylic block on clay and step on it to make impression. The amount of pressure needed to make a good impression might vary according to the softness of the clay or other factors. If you don't like the impression you get, just ball the clay up and roll it out again. When you get an impression you are pleased with, cut into tiles.
- Allow the clay tiles to get leather hard. This is a stage at which the clay is not completely dry and you can carve the clay but not bend it any more. Trim or smooth edges if needed, and cut grooves into back of tiles with a carving tool. This helps the tiles to dry flatter and gives tooth to the underside of the tile for cement to cling to later.
- When tiles are dry enough to stand up to having a weight on them without being marred, allow tiles to dry between two flat porous surfaces. Two work surfaces or two scrap pieces of drywall work well. In a pinch, a couple of cookie sheets (reserved for non-food use) with scrap paper between the metal and clay will work also. The larger the tile, the more care you have to take to make sure it dries flat.
- If you have a kiln, bisque fire your tiles according to the temperature requirements of your clay body. If you don't have a kiln, have your tiles fired at a commercial establishment or a school where you are taking classes (I take Continuing Ed ceramics classes at a local community college because I do not have a kiln or pottery wheel at home).
- Glaze tiles and fire according to temperature requirements of your chosen glaze.
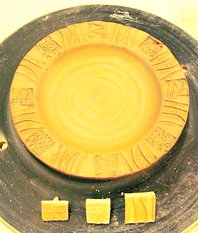 Variation - you may want to make some of your tiles into bisqware clay stamps. If so, put aside a few and attach a clay handle to the back when they are in the leather hard stage. Here is a photo of clay stamps originally made from rubber stamps and a stamped plate.
Make the Mosiac
Tools and Materials
Table - you can build one to order, or get one from a thrift store - lots of opportunities for repurposing materials here!
Ceramic and/or glass tiles
Ceramic tile cement
Plastic lid
Palette knife
Leather work gloves
Goggles
Old towel
Hammer
Tile nippers
Tile grout
Disposable latex or plastic gloves
Small disposable container
1" or wider putty knife, or rubber ceramic throwing rib
Rags
Kitchen scrubbing pad
Tile and grout sealer
The table I used for this project was custom built for me with a raised lip around the edge. If you want to use a table with no lip, you could build one around the edge with strips of wood. Alternately, if the table edge is wide enough you could tile the edge as well as the top.
-
To begin, I laid my tiles out onto the table to make sure I had enough. Then I removed them and made sure the tiles and my work surface were clean and dry. If the table top has a glossy surface, sand it so that the tile cement will have a more receptive surface to stick to.
-
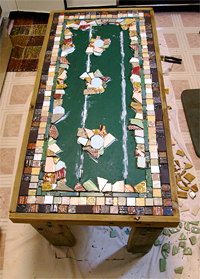 The way you begin to lay the tiles will be influenced by your design. In my example, I have an organized border and a random center, so it made sense to work from the outside in. Put a portion ceramic tile cement on a plastic lid with your palette knife and close up your tile cement container (this is to keep it from drying out). Dab a bit of cement onto each tile and press it into place. If your tiles are of uneven thickness, you can put extra cement on the back of the thinner ones to help even them up.
- As you work, if you need to break up tiles into smaller pieces, one way is to place the pieces between an old towel and smash them with a hammer. Wear leather gloves and goggles when you do this to protect yourself from sharp pieces. For more refined shaping of small pieces, you can cut them with tile nippers. The broken edges can and will cut you if mishandled so be careful!
- Once all your tiles are glued down, let your table dry for 24 hours. Now it's ready to grout! Grout comes in many attractive colors. Depending on the effect you want, you can choose a color that contrasts strongly with your tiles or one that is more harmonious.
-
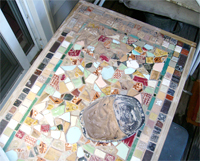 Put on your disposable gloves and mix a small quantity of grout with water in a disposable container such as a cream cheese or sour cream container. Similar to soft cream cheese is a good consistency to aim for. Only mix about as much as you can use in 15 minutes. Push the grout into the cracks between the tiles with the putty knife and wipe well with bunched up rags as you work. The rags will pick up excess grout and protect your hands - be careful when wiping so that your gloved hands do not come into contact with sharp edges of tiles because the disposable gloves are not enough to protect your hands from cuts (ask me how I know!).
-
When grout starts to set up is a good time to go over the wiped tiles with a kitchen srubbing pad. You may need to do this one more time after the grout is dry, then wipe with a clean rag to get the rest of the residue off.
-
Continue with the grout-wipe process until your whole mosaic table top is grouted. After it's all clean, let dry for 24 hours then apply tile and grout sealer. You're done!
Variations:
You can also tile and grout a planter! Here is an example of a mosaic planter that I made from an old metal roasting pan. I painted all inside and out with black Rustoleum paint before tiling so that water would not seep through and weaken the tile bond.
Here is a mosaic windowsill:
And a mosaic shelf made for the bottom of a wrought-iron aquarium stand:
Return to top | Return to Lesson Plan menu
|


 Mosaic Table Top With Textured Clay Tiles
 Variation - you may want to make some of your tiles into bisqware clay stamps. If so, put aside a few and attach a clay handle to the back when they are in the leather hard stage. Here is a photo of clay stamps originally made from rubber stamps and a stamped plate.


 The way you begin to lay the tiles will be influenced by your design. In my example, I have an organized border and a random center, so it made sense to work from the outside in. Put a portion ceramic tile cement on a plastic lid with your palette knife and close up your tile cement container (this is to keep it from drying out). Dab a bit of cement onto each tile and press it into place. If your tiles are of uneven thickness, you can put extra cement on the back of the thinner ones to help even them up.
 Put on your disposable gloves and mix a small quantity of grout with water in a disposable container such as a cream cheese or sour cream container. Similar to soft cream cheese is a good consistency to aim for. Only mix about as much as you can use in 15 minutes. Push the grout into the cracks between the tiles with the putty knife and wipe well with bunched up rags as you work. The rags will pick up excess grout and protect your hands - be careful when wiping so that your gloved hands do not come into contact with sharp edges of tiles because the disposable gloves are not enough to protect your hands from cuts (ask me how I know!).