|
|
 |
|
|
Polymer Clay Lesson Plan 3: Analagous Colors Do you like this tutorial? Share it!
Note: The polymer clay lessons I've written will make the most sense if they are completed in order. If you have not tried Lesson 1, please at least read over the polymer clay saftey information it contains before starting this one. 
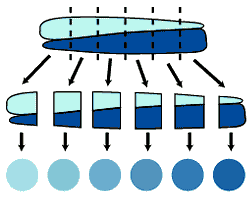
Step 3: Lay the two clay pieces end to end, with the large end of one next to the small end of the other. Press them together slightly, and cut the mass into six pieces. 
Step 4: Blend each of the six pieces together until the colors are completely mixed. You should end up with six different color balls of clay. Step 5: You can exploit subtle gradations in color very effectively in your cane designs. Here are a few patterns you can try with your six colors that you mixed in step 4: 
Step 6: Reduce the canes to the desired diameter of the beads you want. Step 7: Cool the cane in the refrigerator if necessary. If the clay is too warm, the designs will smear when the cane is sliced. Step 8: Slice the canes into beads. Step 9: Poke holes in the beads with wooden skewers. Step 10: Bake the beads. Analagous colors tend to make bright, highly saturated colors when mixed together. However, when you mix complementary colors together, that is colors opposite each other on the color wheel, you get a low saturation color such as brown or gray. If you want, now try the above exercise with two colors that are opposite each other on the color wheel instead of analagous. Here is a PDF document that simulates the above exercise using orange and blue instead of light blue-green and blue. See how much less pure and bright the mixed colors are? If you have a bright color that you want to make less saturated, or duller, you can add a little bit of its opposite color, or complement, to tone it down. You can tone down a color by adding black or gray as well, but you may often find that using the complementary color to achieve this rather than black will produce a warmer and more pleasing color. As always, it pays to experiment to learn how to mix the color you're looking for. |
|
|
|
|
| ||
|
| ||
|
Carolyn's Stamp Store
www.carolynsstampstore.com |
Carolyn Hasenfratz Design
www.chasenfratz.com |
The John's Modern Cabins News
www.jmcnews.com |