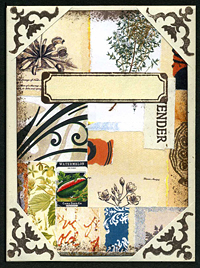
 Seed Packet With Collage Insert
Craft Project by Carolyn Hasenfratz Winkelmann
Copyright © 2014-2021
Do you like this tutorial? Share it!
Contents:
- Introduction
- Tools and Materials
- Start the Envelope
- Make the Collage
- Assemble the Seed Packet
- Additional Ideas
- Resources
Introduction
Seeds are a great spring gift for those in your life who like to garden - think Mother's Day, Father's Day, Arbor Day, Earth Day, Easter and spring birthdays! Whether you have seeds to give that you have harvested yourself or you buy some and want to package them in a more festive way, you'll find a use for this project.
Tools and Materials
Seed Packet Template
Self-sticking laminating sheets
Cardstock and paper
Pencil
Scissors
Metal ruler
Bone folder/creasing tool
Rubber stamp Antique Floral Corner or other rubber stamp of your choice
StazOn Timber brown rubber stamping ink or similar ink of your choice
Self-healing cutting mat
Mat knife or craft knife
Scrap paper
Sponge
Rubber stamp set Products of the Kitchen and Garden or similar stamps
Paper ephemera with botanical and garden-related imagery
Glue stick
Tape - single and double-sided
Rubber stamp set Memory Craft Helpers or label stickers
Eyelets
Eyelet setter
Small hole punch and/or awl
Hammer
Thin string
Start the Envelope
- Download and print out the Seed Packet Template. Cut out and laminate with self-sticking laminating sheets for durability.
- Take a piece of cardstock that you want to become your envelope and place the template on the back. Trace around template witnn pencil and cut out envelope.
- Using metal ruler and bone folder as aids, make the folds for flaps and side of envelope but do not glue or tape the flaps down yet.
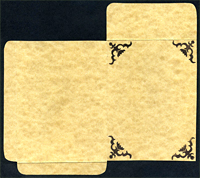
- Flatten out your envelope and place it face down on work surface. Stamp triangular stamp in StazOn Timber Brown in each corner of what will become the front of the envelope - the side with the longer flap.
- Using your self-healing cutting mat, mat knife and metal ruler, cut a slit at an angle in front of each stamped area to make corners for inserting front collage piece.
Make the Collage
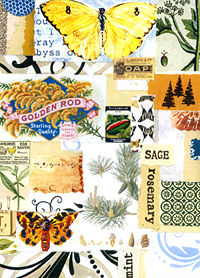 The next step is to make a collage that will be inserted into the front of the seed packet. The piece to be inserted will eventually be cut down to 2 7/8 x 4 in. If you want to make several seed packets use a larger piece of paper as your base and cut it down later. The paper will be completely covered with collage pieces so the color is not terribly important but a light color is best to avoid bleed-through.
- Gather together a bunch of paper emphemera with botanical and garden-related imagery and tear into small pieces using ruler as a straightedge to get straight, controlled tears. See the resources section below for sources of imagery if you need some.
- Coat the backs of the torn pieces with the glue stick and glue down on your backing paper until there are only tiny gaps remaining.
- Tear neutral colored paper into narrow strips and stamp plant names from the set Products of the Kitchen and Garden or other similar stamps you may have onto the strips. Tear apart plant names and glue down over any small gaps remaining in your collage.
- Cut down your collage into 2 7/8 x 4 in pieces.
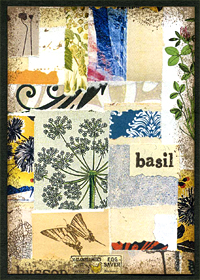
- Sponge the edges with StazOn Timber Brown.
Assemble the Seed Packet
-
Insert collage into corners on front of seed packet and secure from the back with tape. This will keep the collage in place and prevent seeds from getting stuck in crevices.
- Stamp a label from the rubber stamp set Memory Craft Helpers onto light colored paper and cut out. Glue to the front of the seed packet with glue stick. If you don't have that stamp set, another alternative for labels is to use label stickers. See the resources section below for label stickers sold in my catalog.
- Choose some dark brown cardstock or if you don't have any, stamp some cardstock with Timber Brown. Cut out two circles as indicated on the template and put a hole in the middle of each one with the small hole punch or awl. Punch corresponding holes in seed packet and set the circles with an eyelet into position - on the back of the largest flap and one below on the back of the packet.
- Cut a piece of thin string, 10-12 in long. Tie one end around the top circle closure. Later the other end will be wrapped around the lower circle to close the seed packet.
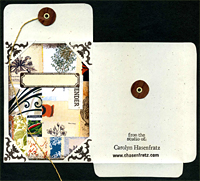
- Optional - stamp a credit stamp if you have one on the back of the seed packet.
- Apply double sided tape to the two narrower tabs, trim off any excess, fold in tabs and press together to assemble packet.
- Put seed in envelope, wind string around both circle fasteners to close, and write contents of packet on the label. You're done!
Additional Ideas
Use these seed packets as spring party favors or place markers.
Bundle several seed packets together with other gardening items to make a superb gift for a gardener. You can even make homemade personal care products that gardeners could use or that complement the type of seeds in the packet. Ideas and recipes can be found on my soapmaking web page.
Mount packets on wooden skewers and display them by poking into florist foam in a decorative pot.
Make a greeting card with a pocket on the front and tuck in seed packet.
Resources
Sources of vintage images you might want to use:
Return to top | Return to Lesson Plan menu
|


 Seed Packet With Collage Insert
 The next step is to make a collage that will be inserted into the front of the seed packet. The piece to be inserted will eventually be cut down to 2 7/8 x 4 in. If you want to make several seed packets use a larger piece of paper as your base and cut it down later. The paper will be completely covered with collage pieces so the color is not terribly important but a light color is best to avoid bleed-through.

