Lime Green News Home My Art Work Lesson Plans Rubber Stamps Photo Album Site Info Site Map Links


Words: Charm Bracelet Lesson Plan
.

Small Journal with Pockets Small Journal with Pockets
Rubber Stamping Project by Carolyn Hasenfratz
Copyright © 2010

Do you like this tutorial? Share it!

Contents:
  • Introduction
  • Tools and Materials
  • Stamp the Cover
  • Make the Pages
  • Assemble the Book


Introduction

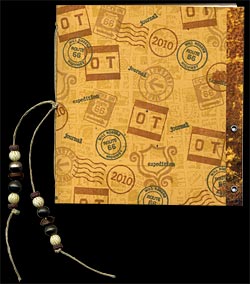
Here is a small journal designed to make and bring with you on a special trip. Take notes and make sketches to remember your journey, or use it for a Letterboxing logbook. By folding the cover piece inward at the bottom, you can make pockets inside for tucking in loose pieces of paper, ticket stubs, photos and other memorabilia.

Tools and Materials

8.5" x 11" piece of dark ochre cardstock
12 8.5" x 11" sheets of off white text weight paper
Card stock with faux leather pattern
Dye-based rubber stamping ink
Rubber stamps
Paper cutter
Pencil
Self-healing cutting mat
Folding tool
Awl
1mm hemp cord
Large needle
Scissors
Utility knife with fresh sharp blade
Metal ruler
Glue stick
Small hole punch
Eyelet setter
Gunmetal colored eyelets
Hammer
Small beads


Stamp the Cover
  1. Stamp one side of the ochre cardstock all over with a background stamp in Saffron ink.

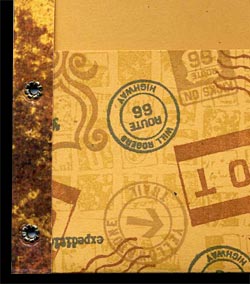
  2. Using Light Brown ink, stamp the outline portion of the set Antique Shield Set, Yellowstone Trail, and Kicks on 66.

  3. With Sienna ink, stamp Ozark Trail, Faux Postmark Circle with Wavy Lines and the number 2010 from the set Year Numbers 2.

  4. Stamp Will Rogers Highway and the words "journal" and "expedition" from the set Evocative Words II with Flannel Gray ink

  5. Set aside the cardstock to let the cover dry.


Make the Pages
  1. Cut down the pieces of text weight paper to 11" x 5 5/8" and fold in half, scoring with the folding tool to make sharper folds.

  2. Take your stamped cardstock cover and from the bottom long edge, make marks 2 3/4" up on the non printed side with pencil and fold it up.

  3. Fold the cover in half.


Assemble the Book
  1. Nest the inside pages inside each other and nest those in the folded cover, and center the inside pages vertically.

  2. Make dots with pencil inside the fold of the innermost sheet 1/2" from the top, 2 13/16" from the top (the middle), and 1/2" from the bottom.

  3. Push your awl through all the pages and the cover at each hole.

  4. Cut a piece of 1mm hemp cord about 40" long and thread your needle.

  5. Start from the outside of the book. Push the needle through the middle hole in the spine. Go through the top hole, back through the middle hole, through the bottom hole and then through the middle again in a figure 8 pattern. Repeat.

  6. Tighten the cord and tie it off, leaving the ends trailing on the outside.

  7. Thread small beads onto the cord ends, tie off, and trim.

  8. Place the book onto a self-healing cutting mat, and place a metal ruler along the fore edge (the edge opposite the spine) of the cover. Trim the protruding paper ends off with a utility knife.

  9. Cut two 1" x 5 13/16" pieces from the leather printed cardstock. Fold each in half lengthwise, with leather printed side facing out.

  10. Run a glue stick down the inside of each piece and wrap them around the fore edges of the book. Rub with the folding tool to make a nice tight seal.

  11. Small Journal with Pockets
  12. In the center of the faux leather strip, make a hole 1/2" from the top of the folder pocket and another 1/2" from the bottom of the folder pocket with a small hole punch in the front and back cover.

  13. Set an eylet into each hole. You're done!


Return to top | Return to Lesson Plan menu


Copyright © 1996-2018 by Carolyn Hasenfratz
Home | My Art Work | Lesson Plans | Photo Album | Site Info | Links
Please also visit my other web sites:
Carolyn Hasenfratz Design
www.chasenfratz.com/wp
Etsy Shop
http://www.etsy.com/shop/CarolynsStampStore
Sell 66 Stuff
www.sell66stuff.com