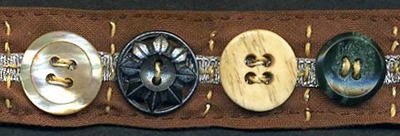
 Button Headband
Craft Project by Carolyn Hasenfratz Winkelmann
Copyright © 2013-2021
Do you like this tutorial? Share it!
Contents:
- Introduction
- Tools and Materials
- Make the Headband
- Make a Matching Bracelet
- Tools and Materials
Introduction
Do you like to collect old buttons? Get some of them out of the jar and wear them! The rustic look of this headband is suitable for displaying an assortment of earth-toned buttons (and does not tax my rudimentary sewing skills). I wear headbands constantly and it gets frustrating to have to buy new ones when the elastic goes out. With this headband design, the main part of the headband does not stretch and the elastic in back can be easily replaced when it wears out.
Tools and Materials
Measuring tape
1 inch wide bias tape or ribbon
Narrow metallic ribbon
Pins
Button and carpet thread
Buttons
Sewing thread
Needles
Scissors
Fray-check or glue
2 metal or plastic rings, 1 inch in diameter
Elastic
Make the Headband
- Measure around your head about two inches past your ears. Cut out two pieces that length of 1 inch wide ribbon or bias tape. I used brown bias tape in this sample.
- Cut out a piece of narrow metallic ribbon the same length and pin it down the center of one of the pieces of bias tape. You don't have to use metallic ribbon, any harmonious color will do, but I find that a touch of metallic helps out many designs.
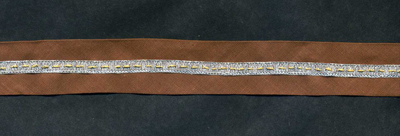
- Using embroidery-weight thread, sew a running stitch lengthwise down the middle of the narrow ribbon. I chose an ochre yellow color with a strand of metallic running through it. Choose a color that contrasts with the 1 inch wide ribbon you're using. Tie thread off in back.
- Choose an assortment of buttons that harmonize with your ribbon and thread colors. You'll need enough to cover the headband to the point where it reaches the top of your ears. In my case, that was 17 buttons (I have a big head!).
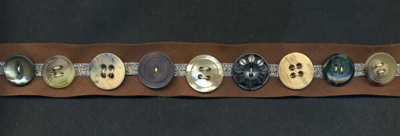
- Arrange the buttons on your work surface in front of you in the order you want them, with the largest toward the middle. Fold the headband in half to determine where the middle button will go. Work your way down one side and then the other, sewing buttons in place with button and carpet thread. Choose a thread color that is as close to your embroidery thread color as possible. The reason I use button and carpet thread for this step is that I've found out from experience that with wear the embroidery thread is sometimes not enough to hold the buttons. Leave about 1/4 inch of space between each button. Tie thread off in back.
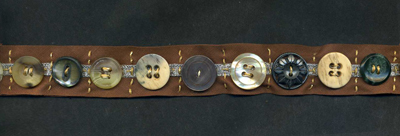
- Going back to your embroidery thread color, start at one end and make running stitches perpendicular to the ribbon in front of the first button. Go back through the button with the embroidery thread. Make perpendicular stitches between and through each subsequent button until you reach the other end. Tie thread off in back. Put Fray-check or glue on the knots and let dry.
- Take your second piece of 1 inch wide ribbon or bias tape and pin it "good side" out along the back of your headband. This is to hide all your knots and stitches, make it more comfortable on your head, and make it more durable.
- Thread a needle with sewing thread and stitch the edges of the ribbon together. I used running stitches but you might prefer another stitch such as blanket stitch or whip stitch with a heavier weight of thread. To disguise my imperfect stitches, I choose a dark brown sewing thread to blend in with my brown background. You might prefer a thread that stands out a little more.
- Fold over each end of the headband through a ring and stitch the ends down. You'll want some strong stitching here so go over the seam several times.
- Cut a piece of elastic to loop between the two rings. You'll probably want to stitch one side down first and test the headband on your head to get just the right amount of stretch. Too tight and you'll get a headache, too loose and it might fall off! After you're done sewing, put Fray-check or glue on the knots and let dry. You're done!
Make a Matching Bracelet
Ok let me rephrase that, for the casual look that this headband would be part of, I don't really like jewelry and accessories to match exactly. But if you want to make a bracelet that matches or is just similar, here is how to do it.
Tools and Materials
Measuring tape
1 inch wide bias tape or ribbon
Complementary ribbon is various thicknesses
Pins
Embroidery weight thread
Button and carpet thread
Sticky back velcro
Buttons
Sewing thread
Needles
Scissors
Fray-check or glue
- Measure and cut two pieces of bias tape or ribbon that will fit around your wrist plus 1 3/4 inches.
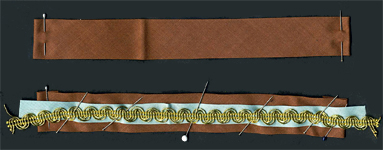
- If necessary, fold in the ends of each piece of bias tape or ribbon and hem the ends with thread that matches the color of your ribbon or bias tape. Make your knots on the back side - they'll be hidden when the two pieces are sewed togehter later.
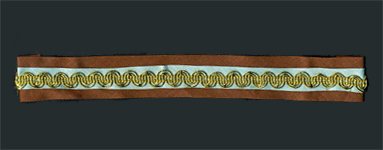
- Select one or two pieces of ribbon to run down the middle and cut them about an inch longer than your base piece of bias. For my example I decided to layer some gold trim over a slightly wider piece of aqua ribbon. Pin in place onto the front of one of your pieces of bias tape or ribbon and sew on with complementary colored thread. I used gold in this case. Wrap the ribbon around the back and secure with thread.
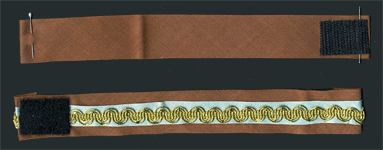
- Cut a 1 inch long piece of velcro and pull the two halves apart. Stick one half one end of what will be your top piece. Stick the other half on the opposite end of what will be your bottom piece. Reinforce by sewing around the perimeter of each piece of velcro with black thread.
- Sew an assortment of buttons onto the top piece.
- Apply Fray-check or glue to your knots and let dry.
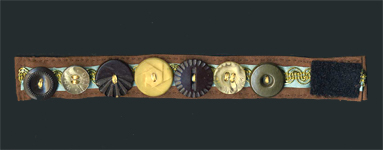
- Place the two pieces back to back with the velcro facing out and all the cut threads and knots hidden inside. Make sure the velcro patches line up correctly then sew all around with thread to attach the top and bottom together. You can choose a similar color thread if you don't want the stitches to be conspicuous, or a contrasting color if you want the stitches to stand out. The bracelet is ready to wear!
Return to top | Return to Lesson Plan menu
|


 Button Headband


