
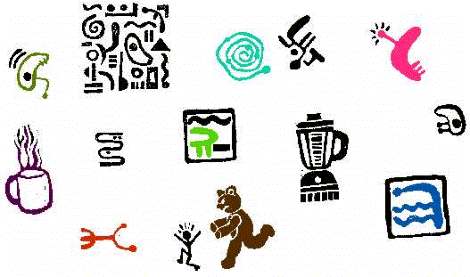
Above are some of my favorite stamps that I've carved. I mostly use them for stamping on mail art, but they also can be used on fabric, wood, beads, shrink plastic, and all kinds of other surfaces. For stamping on wood or fabric, I use acrylic paint and sponge it onto the stamp. Permanent ink or acrylic paint both work well on shrink plastic. I also use them frequently for making textures to use in collages. I do collect some commercial rubber stamps too, but I generally prefer the hand carved look. I use an exacto knife blade without a handle (I get better control that way) and carve on EZ cut or Magic Rub erasers.
These stamps are only a couple of inches long or less. They are easy to print. Just pick them up, dab them on a stamp pad (available where you buy office, craft, or art supplies), and press onto the paper. What if you want to do a larger carving? The material is available in sizes up to 12" x 12". How do you get it to print evenly, or what if you want to print two or more colors? Following is a composite of two e-mail messages I sent to the Carving Consortium mailing list explaining the way I learned to print and register larger blocks. The exchange began with an inquiry from a list member wanting to know what a baren was and how it was used.
 Carolyn's Message on Printing:
"We used a baren in printmaking class. You lay down the printing block face up (inked), put a sheet of paper over it and rub the baren all over the back of the paper. From time to time you lift up the corner of the paper to see if enough ink has been transferred. When you are satisfied, pull the whole sheet up. A baren is useful for larger images because it is difficult to get an even impression. A spoon can also be used.
For the purposes of this list, here is a suggestion for registration should anyone want to do a multiple color print and you're not using a press. This kind of printing is often called a "spoon print" because the tool of choice to rub the back of the print is commonly a spoon. When I took block printing, we each constructed a frame. Take a piece of thin (1/4") plywood that is the size of the biggest printing block you will use. Nail some 1/2" X whatever width seems adequate (we used 4" in class) wood along two sides of the board like this:
______________________
|    |________X_________|
|    |         |        |
|    |   block |        |
|    |_________|        |
|    |                  |
|    |                  |
|_   |__________________|
At the spot where the x is on the diagram, attach a clip like the ones on a clipboard (you can buy a clipboard and yank it off and use it if you can't find one separate.) Build up your printing block so it's the same height as the boards and your image is just barely raised over the height of the boards as seen from the side. You can mount the block on wood to accomplish this or build up layers of cardboard, etc. underneath the block, whatever it takes to get it at the right height. The printing block can be any kind of relief block - linoleum, EZ Cut, PZ Cut, mat board, etc.
1) Clip your paper to the board in a way that will leave an even border around all sides of the printing block (if that matters).
2) Ink your block.
3) Lift the clipped paper and slide the printing block right up in the corner. Carefully lower the paper onto the block and run your hand over the back to stick it down.
4) Put some pins in the border of the paper. Probably 2-4 would be adequate. The pins will not only keep the paper steady while you rub, they will allow you to line the print up in exactly the same spot when it's time for the next color. Just follow the holes! When you get a lot of holes in the board, mark them with different color markers to keep straight which holes go with which print. (For subsequent colors, if any, pin the paper before you put the printing block in place, at least at the top, to make sure it is registered properly.)
5) Rub the back of the paper with the tool of your choice (baren, spoon, ink can, etc.) until it's dark enough for your satisfaction. (That takes practice!)
6) Repeat steps 1-5 for each color.
I haven't even talked about paper or ink yet! I learned with oil based block printing ink and Japanese block printing paper such as Masa (inexpensive student grade). I am going to try handmade paper. What would everyone else use? I'm curious."
Images and words copyright 1996-7 by Carolyn.
Would you like to join
the Carving Consortium? Here is a message from member Linda Berman
that will tell you all about it! Send her an e-mail message if
you want to join!"Hi Carvers,
Thanks for showing interest in "The Carving Consortium". The Carving Consortium (CC) is an online carving study group with a mailing list (email), currently with over 30 members; some more active than others; some highly experienced and some doing their first carvings now. I began this project early in '97. We communicate online with our messages to the whole group. Within the first week or so we had 34 members who meet online to share their carving information. We're a mailing list; not a listserv. We are all located across the United States, we have different lifestyles and other concerns that may come first in our lives; so there's no pressure and no obligation to participate in any of our activities. Participation is for when you want to and when you're ready.
For right now the only limitations to new members is that they need to be in the U.S. to make mailing easy (for me); and they need to have an email address where they'll receive and send messages, and they have to be willing to share their snailmail (street) address with the group. We have agreed to keep our snailmail address list confidential amongst CC members. Some people prefer to mail their carvings to all the members and others prefer to join our swap.
Please reply to this message and send me your snailmail address if you're interested in joining us. As soon as you send me your snailmail address (by email), I'll send you the current list of members and you can create a group message with the 30+ members. All CC members should be receiving your messages. Currently, it appears that some AOL software has a problem doing that. If that is your situation, please send me the message that you want to send to the group, and put in the opening line of it that you want it posted to the group and I'll be glad to forward the message to the entire group for you.
If you have any questions, please don't hesitate to ask. We look forward to sharing our information and having opportunities to do swaps, group projects; and have our images displayed and published. I'm eager to hear if you have any suggestions for us. Please note that some members do not participate; they only receive the CC messages, and that's okay too. I hope you'll join us and start sharing your carved images, your carving information and your creativity."

Send e-mail to Carolyn Substitute.